▌文章的主要内容包括:
- 服务注册/发现
- 服务注册表
- 健康检查
在上一篇文章的开始,我们提到解决微服务架构中的通信问题,基本只要解决下面三个问题:
- 服务网络通信能力
- 服务间的数据交互格式
- 服务间如何相互发现与调用
网络的互通保证了服务之间是可以通信的,通过对JSON 的序列化和反序列化来实现网络请求中的数据交互。Choerodon 的 API 网关则统一了所有来自客户端的请求,并将请求路由到具体的后端服务上。然而这里就会有一个疑问,API 网关是如何与后端服务保持通信的,后端服务之间又是如何来进行通信的?当然我们能想到最简单的方式就是通过 URL + 端口的形式直接访问(例如:http://127.0.0.1:8080/v1/hello)。
在实际的生产中,我们认为这种方式应该是被避免的。因为 Choerodon 的每个服务实例都部署在K8S的不同 pod中,每一个服务实例的 IP 地址和端口都可以改变。同时服务间相互调用的接口地址如何管理,服务本身集群化后又是如何进行负载均衡。这些都是我们需要考虑的。
为了解决这个问题,自然就想到了微服务架构中的注册中心。一个注册中心应该包含下面几个部分:
- 服务注册/发现:服务注册是微服务启动时,将自己的信息注册到注册中心的过程。服务发现是注册中心监听所有可用微服务,查询列表及其网络地址。
- 服务注册表:用来纪录各个微服务的信息。
- 服务检查:注册中心使用一定的机制定时检测已注册的服务,如果发现某实例长时间无法访问,就会从服务注册表中移除该实例。
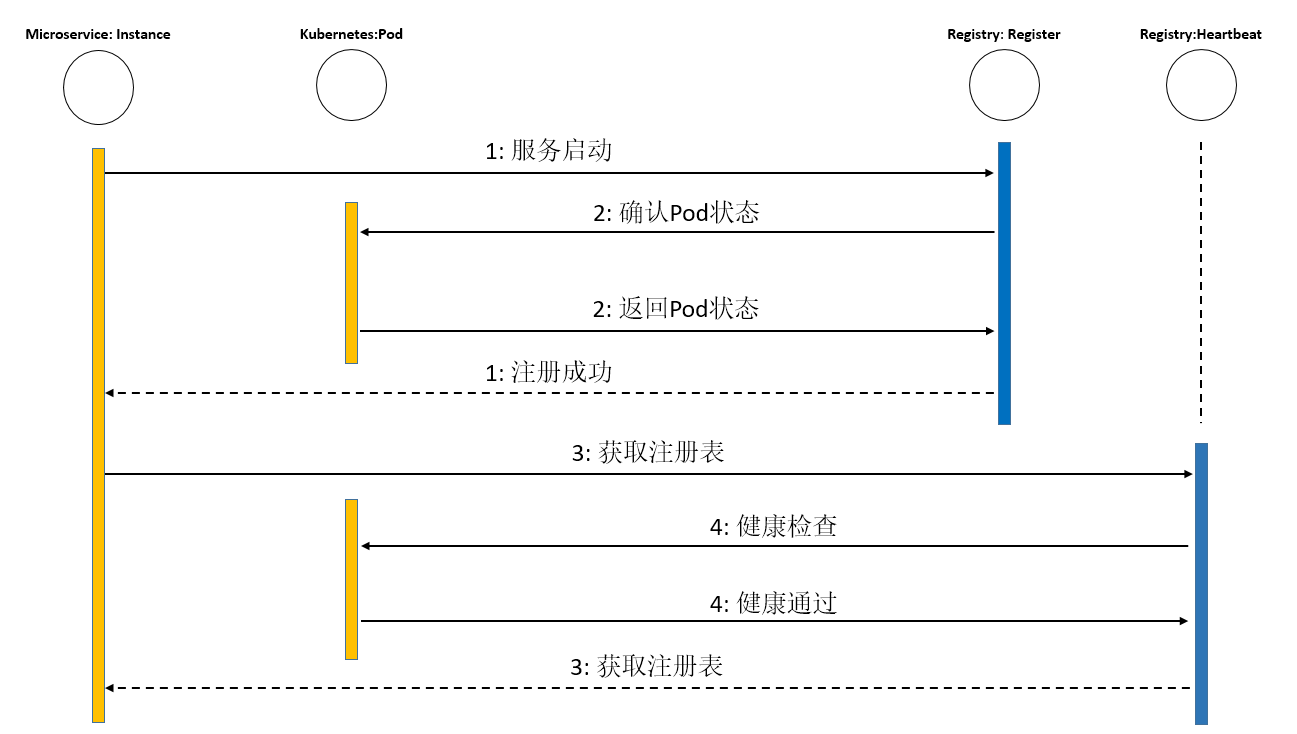
Choerodon 中服务注册的过程如下图所示:

服务注册/发现
当我们通过接口去调用其他服务时,调用方则需要知道对应服务实例的 IP 地址和端口。对于传统的应用而言,服务实例的网络地址是相对不变的,这样可以通过固定的配置文件来读取网络地址,很容易地使用 HTTP/REST 调用另一个服务的接口。
但是在微服务架构中,服务实例的网络地址是动态分配的。而且当服务进行自动扩展,更新等操作时,服务实例的网络地址则会经常变化。这样我们的客户端则需要一套精确地服务发现机制。
Eureka 是 Netflix 开源的服务发现组件,本身是一个基于REST的服务。它包含 Server 和 Client 两部分。
Eureka Server 用作服务注册服务器,提供服务发现的能力,当一个服务实例被启动时,会向 Eureka Server 注册自己的信息(例如IP、端口、微服务名称等)。这些信息会被写到注册表上;当服务实例终止时,再从注册表中删除。这个服务实例的注册表通过心跳机制动态刷新。这个过程就是服务注册,当服务实例注册到注册中心以后,也就相当于注册中心发现了服务实例,完成了服务注册/发现的过程。
阅读 Spring Cloud Eureka 的源码可以看到,在eureka-client-1.6.2.jar 的包中,com.netflix.discovery. DiscoveryClient 启动的时候,会初始化一个定时任务,定时的把本地的服务配置信息,即需要注册到远端的服务信息自动刷新到注册服务器上。该类包含了Eureka Client 向 Eureka Server 注册的相关方法。
在 DiscoveryClient 类有一个服务注册的方法 register(),该方法是通过 HTTP 请求向Eureka Server 注册。其代码如下:
boolean register() throws Throwable {
        logger.info(PREFIX + appPathIdentifier + ": registering service...");
        EurekaHttpResponse<Void> httpResponse;
        try {
            httpResponse = eurekaTransport.registrationClient.register(instanceInfo);
        } catch (Exception e) {
            logger.warn("{} - registration failed {}", PREFIX + appPathIdentifier, e.getMessage(), e);
            throw e;
        }
        if (logger.isInfoEnabled()) {
            logger.info("{} - registration status: {}", PREFIX + appPathIdentifier, httpResponse.getStatusCode());
        }
        return httpResponse.getStatusCode() == 204;
    }
对于 Choerodon 而言,客户端依旧采用 Eureka Client,而服务端采用 GoLang 编写,结合 K8S,通过主动监听 K8S 下 pod 的启停,发现服务实例上线,Eureka Client 则通过 HTTP 请求获取注册表,来实现服务注册/发现过程。
注册中心启动时,会构造一个podController,用来监听pod 的生命周期。代码如下:
func Run(s *options.ServerRunOptions, stopCh <-chan struct{}) error {
    ... ...
    podController := controller.NewController(kubeClient, kubeInformerFactory, appRepo)


    go kubeInformerFactory.Start(stopCh)

    go podController.Run(instance, stopCh, lockSingle)

    return registerServer.PrepareRun().Run(appRepo, stopCh)
}
在github.com/choerodon/go-register-server/controller/controller.go 中定义了 Controller,提供了 Run() 方法,该方法会启动两个进程,用来监听环境变量 REGISTER_SERVICE_NAMESPACE 中配置的对应 namespace 中的pod,然后在pod 启动时,将 pod 信息转化为自定义的服务注册信息,存储起来。在 pod 下线时,从存储中删除服务信息。其代码如下:
func (c *Controller) syncHandler(key string, instance chan apps.Instance, lockSingle apps.RefArray) (bool, error) {
    namespace, name, err := cache.SplitMetaNamespaceKey(key)
    if err != nil {
        runtime.HandleError(fmt.Errorf("invalid resource key: %s", key))
        return true, nil
    }
    pod, err := c.podsLister.Pods(namespace).Get(name)
    if err != nil {
        if errors.IsNotFound(err) {
            if ins := c.appRepo.DeleteInstance(key); ins != nil {
                ins.Status = apps.DOWN
                if lockSingle[0] > 0 {
                    glog.Info("create down event for ", key)
                    instance <- *ins
                }
            }
            runtime.HandleError(fmt.Errorf("pod '%s' in work queue no longer exists", key))
            return true, nil
        }
        return false, err
    }
    _, isContainServiceLabel := pod.Labels[ChoerodonServiceLabel]
    _, isContainVersionLabel := pod.Labels[ChoerodonVersionLabel]
    _, isContainPortLabel := pod.Labels[ChoerodonPortLabel]
    if !isContainServiceLabel || !isContainVersionLabel || !isContainPortLabel {
        return true, nil
    }
    if pod.Status.ContainerStatuses == nil {
        return true, nil
    }
    if container := pod.Status.ContainerStatuses[0]; container.Ready && container.State.Running != nil && len(pod.Spec.Containers) > 0 {
        if in := convertor.ConvertPod2Instance(pod); c.appRepo.Register(in, key) {
            ins := *in
            ins.Status = apps.UP
            if lockSingle[0] > 0 {
                glog.Info("create up event for ", key)
                instance <- ins
            }
        }
    } else {
        if ins := c.appRepo.DeleteInstance(key); ins != nil {
            ins.Status = apps.DOWN
            if lockSingle[0] > 0 {
                glog.Info("create down event for ", key)
                instance <- *ins
            }
        }
    }
    return true, nil
}
github.com/choerodon/go-register-server/eureka/repository/repository 中的 ApplicationRepository 提供了 Register() 方法,该方法手动将服务的信息作为注册表存储在注册中心中。
func (appRepo *ApplicationRepository) Register(instance *apps.Instance, key string) bool {

    if _, ok := appRepo.namespaceStore.Load(key); ok {
        return false
    } else {
        appRepo.namespaceStore.Store(key, instance.InstanceId)
    }
    appRepo.instanceStore.Store(instance.InstanceId, instance)
    return true
}
通过上面的代码我们可以了解到Choerodon 注册中心是如何实现服务注册的。有了注册中心后,下面我们来介绍下服务发现中的服务注册表。
服务注册表
在微服务架构中,服务注册表是一个很关键的系统组件。当服务向注册中心的其他服务发出请求时,请求调用方需要获取注册中心的服务实例,知道所有服务实例的请求地址。
Choerodon 沿用 Spring Cloud Eureka 的模式,由注册中心保存服务注册表,同时客户端缓存一份服务注册表,每经过一段时间去注册中心拉取最新的注册表。
在github.com/choerodon/go-register-server/eureka/apps/types 中定义了Instance 对象,声明了一个微服务实例包含的字段。代码如下:
type Instance struct {
    InstanceId       string            `xml:"instanceId" json:"instanceId"`
    HostName         string            `xml:"hostName" json:"hostName"`
    App              string            `xml:"app" json:"app"`
    IPAddr           string            `xml:"ipAddr" json:"ipAddr"`
    Status           StatusType        `xml:"status" json:"status"`
    OverriddenStatus StatusType        `xml:"overriddenstatus" json:"overriddenstatus"`
    Port             Port              `xml:"port" json:"port"`
    SecurePort       Port              `xml:"securePort" json:"securePort"`
    CountryId        uint64            `xml:"countryId" json:"countryId"`
    DataCenterInfo   DataCenterInfo    `xml:"dataCenterInfo" json:"dataCenterInfo"`
    LeaseInfo        LeaseInfo         `xml:"leaseInfo" json:"leaseInfo"`
    Metadata         map[string]string `xml:"metadata" json:"metadata"`
    HomePageUrl      string            `xml:"homePageUrl" json:"homePageUrl"`
    StatusPageUrl    string            `xml:"statusPageUrl" json:"statusPageUrl"`
    HealthCheckUrl   string            `xml:"healthCheckUrl" json:"healthCheckUrl"`
    VipAddress       string            `xml:"vipAddress" json:"vipAddress"`
    SecureVipAddress string            `xml:"secureVipAddress" json:"secureVipAddress"`

    IsCoordinatingDiscoveryServer bool `xml:"isCoordinatingDiscoveryServer" json:"isCoordinatingDiscoveryServer"`
    LastUpdatedTimestamp uint64 `xml:"lastUpdatedTimestamp" json:"lastUpdatedTimestamp"`
    LastDirtyTimestamp   uint64 `xml:"lastDirtyTimestamp"   json:"lastDirtyTimestamp"`
    ActionType           string `xml:"actionType" json:"actionType"`
}
客户端可以通过访问注册中心的/eureka/apps 接口获取对应的注册表信息。如下所示:
{
  "name": "iam-service",
  "instance": [
    {
      "instanceId": "10.233.73.39:iam-service:8030",
      "hostName": "10.233.73.39",
      "app": "iam-service",
      "ipAddr": "10.233.73.39",
      "status": "UP",
      "overriddenstatus": "UNKNOWN",
      "port": {
        "@enabled": true,
        "$": 8030
      },
      "securePort": {
        "@enabled": false,
        "$": 443
      },
      "countryId": 8,
      "dataCenterInfo": {
        "name": "MyOwn",
        "@class": "com.netflix.appinfo.InstanceInfo$DefaultDataCenterInfo"
      },
      "leaseInfo": {
        "renewalIntervalInSecs": 10,
        "durationInSecs": 90,
        "registrationTimestamp": 1542002980,
        "lastRenewalTimestamp": 1542002980,
        "evictionTimestamp": 0,
        "serviceUpTimestamp": 1542002980
      },
      "metadata": {
        "VERSION": "2018.11.12-113155-master"
      },
      "homePageUrl": "http://10.233.73.39:8030/",
      "statusPageUrl": "http://10.233.73.39:8031/info",
      "healthCheckUrl": "http://10.233.73.39:8031/health",
      "vipAddress": "iam-service",
      "secureVipAddress": "iam-service",
      "isCoordinatingDiscoveryServer": true,
      "lastUpdatedTimestamp": 1542002980,
      "lastDirtyTimestamp": 1542002980,
      "actionType": "ADDED"
    }
  ]
}
我们可以在服务注册表中获取到所有服务的 IP 地址、端口以及服务的其他信息,通过这些信息,服务直接就可以通过 HTTP 来进行访问。有了注册中心和注册表之后,我们的注册中心又是如何来确保服务是健康可用的,则需要通过健康检查机制来实现。
健康检查
在我们提供了注册中心以及服务注册表之后,我们还需要确保我们的服务注册表中的信息,与服务实际的运行状态保持一致,需要提供一种机制来保证服务自身是可被访问的。在Choerodon微服务架构中处理此问题的方法是提供一个健康检查的端点。当我们通过HTTP 进行访问时,如果能够正常访问,则应该回复HTTP 状态码200,表示健康。
Spring Boot 提供了默认的健康检查端口。需要添加spring-boot-starter-actuator 依赖。
<dependency>
     <groupId>org.springframework.boot</groupId>
     <artifactId>spring-boot-starter-actuator</artifactId>
</dependency>
访问/health 端点后,则会返回如下类似的信息表示服务的状态。可以看到 HealthEndPoint 给我们提供默认的监控结果,包含磁盘检测和数据库检测等其他信息。
{
    "status": "UP",
    "diskSpace": {
        "status": "UP",
        "total": 398458875904,
        "free": 315106918400,
        "threshold": 10485760
    },
    "db": {
        "status": "UP",
        "database": "MySQL",
        "hello": 1
    }
}
K8S通过,/health通过K8S通过,/health未通过K8S未通过,/health通过
第一种情况,当两种都通过的话,服务是可以被访问的。
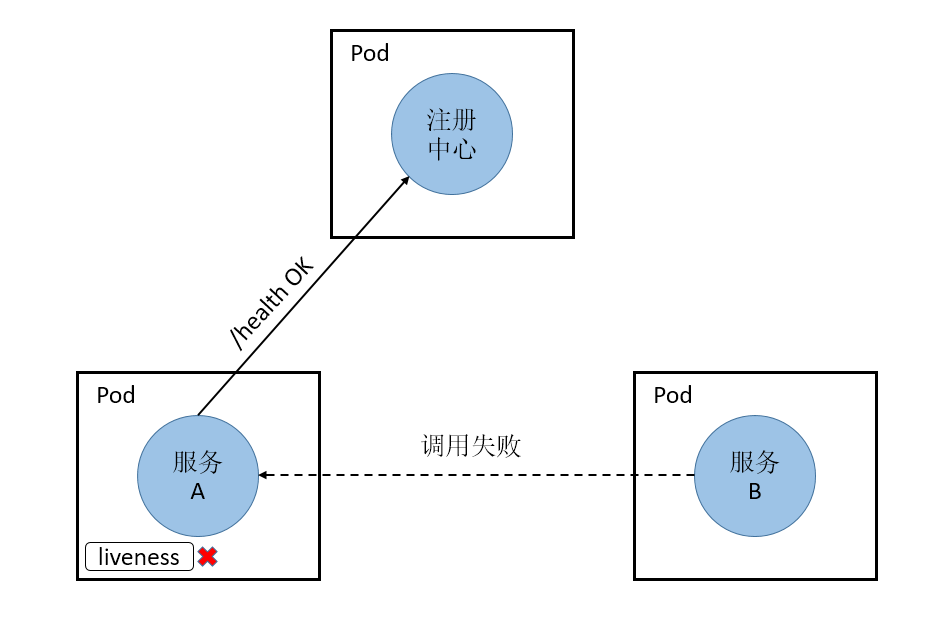
第二种情况,K8S 认为服务是正常运行的,但注册中心认为服务是不健康的,注册表中不会记录该服务,这样其他服务则不能获取该服务的注册信息,也就不会通过接口进行服务调用。则服务间不能正常访问。如下图所示。

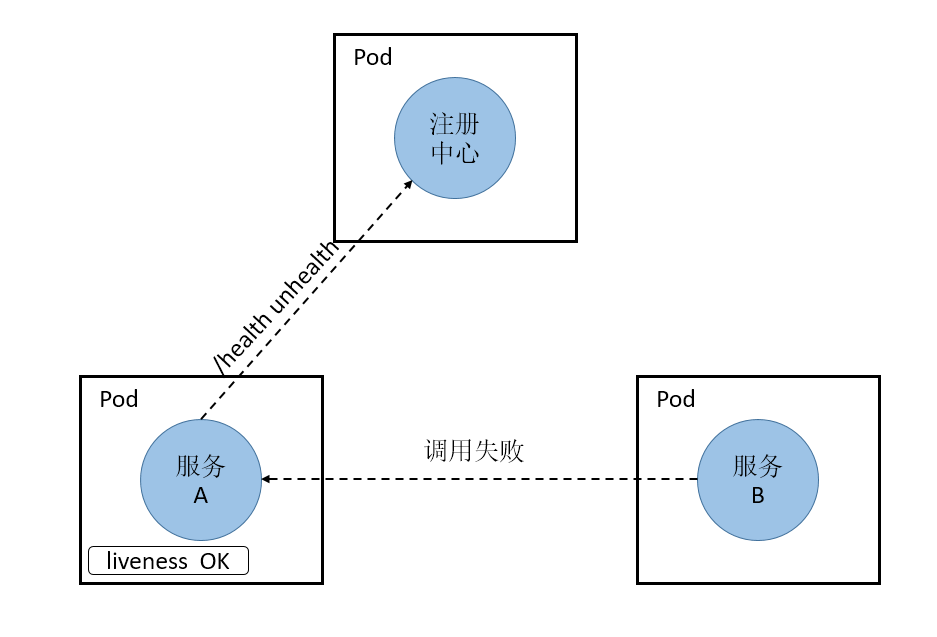
第三种情况,服务通过心跳告知注册中心自己是可用的,但是可能因为网络的原因,K8S 将 pod 标识为不可访问,这样当其他服务来请求该服务时,则不可以访问。这种情况下服务间也是不能正常访问的。如下图所示。

同时,当我们配置了管理端口之后,该端点则需要通过管理端口进行访问。可以在配置文件中添加如下配置来修改管理端口。
management.port: 8081
但是在这种情况下,会使我们的健康检查变得更加复杂,健康检查并不能获取服务真正的健康状态。
在这种情况下,Choerodon 使用 K8S 来监听服务的健康端口,同时需要保证服务的端口与管理端口都能被正常访问,才算通过健康检查。可以在部署的 deploy 文件中添加readinessProbe 参数。
apiVersion: v1
kind: Pod
spec:
  containers:
    readinessProbe:
      exec:
        command:
        - /bin/sh
        - -c
        - curl -s localhost:8081/health --fail && nc -z localhost 8080
      failureThreshold: 3
      initialDelaySeconds: 60
      periodSeconds: 10
      successThreshold: 1
      timeoutSeconds: 10
这样,当我们的服务启动之后,才会被注册中心正常的识别。当服务状态异常时,也可以尽快的从注册表中移除。
关于猪齿鱼
Choerodon 猪齿鱼是一个全场景效能平台,基于 Kubernetes 的容器编排和管理能力,整合 DevOps 工具链、微服务和移动应用框架,来帮助企业实现敏捷化的应用交付和自动化的运营管理的平台,同时提供 IoT、支付、数据、智能洞察、企业应用市场等业务组件,致力帮助企业聚焦于业务,加速数字化转型。
大家也可以通过以下社区途径了解猪齿鱼的最新动态、产品特性,以及参与社区贡献: